Gadget development for mouse coordinates
I made an automated tool recently and found that it was horrible to get the current coordinates of the mouse when developing. It’s a waste of time to use the Photoshop ruler for viewing the screenshots, so I wrote a small tool to get the coordinates. The autopy library is used to implement the function, and Tkinter is used to draw the interface. Convenient for further development in the next step.
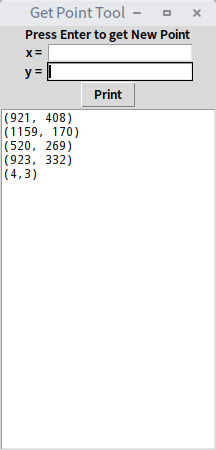
Effect
When we press Enter or click the Print button, if the upper input box is non-empty, the coordinates in the frame will be printed in the bottom text box, otherwise the coordinates of the current mouse coordinates will be printed.
Usage
You can quickly record what coordinates you want to use, and then automate the processing.
Principle
autopy is a lightweight cross-platform Python library that features analog buttons and mouse, color and image processing. The image portion is not as well known as PIL, and automation is not as famous as pywin32. But its usage is simple and not limited by the platform, it is very easy to use to simulate clicks.
Tkinter is a GUI library that comes with Python. The layout is rough and the interface is simple, but its cross-platform is stable, so it is suitable for this kind of gadget. In contrast, PyQt, although rich in interface, is slightly bloated in this scenario.
Implementation
lab environment:
- Python 2.X
First install autopy, during the installation, you may meet the following error:1
error: command 'x86_64-linux-gnu-gcc' failed with exit status 1
Solution:1
sudo apt-get install libx11-dev libxtst-dev libpng-dev
Then install it.1
sudo pip install autopy
After the installation is complete, test if you can get the coordinates.1
2import autopy
print autopy.mouse.get_pos()
Now writing the GUI is not complicated.1
2
3
4
5
6
7
8
9
10
11
12
13
14
15
16
17
18
19
20
21
22
23
24
25
26
27
28
29
30
31
32
33
34
35
36
37
38
39
40import autopy
from Tkinter import *
master = Tk()
master.title("Get Point Tool")
#columnspan=2 means spanning two columns
Label(master,text = "Press Enter to get New Point").grid(row = 0, columnspan = 2)
#sticky=E means aligned to the right
Label(master, text = 'x = ').grid(row = 1, sticky = E)
Label(master, text = 'y = ').grid(row = 2, sticky = E)
e1 = Entry(master)
e2 = Entry(master)
e1.grid(row = 1, column = 1, sticky = W)
e2.grid(row = 2, column = 1, sticky = W)
#Insert coordinates into the text box
def print_point():
if(e1.get()=="" or e2.get()==""):
text_output.insert(0.0, str(autopy.mouse.get_pos())+"\n")
else:
text_output.insert(0.0, "("+e1.get()+","+e2.get()+")" + "\n")
#Clear the values of the x and y text boxes. delete(0,1000) indicates the deletion of the 0th to the 1000th values.
e1.delete(0,1000)
e2.delete(0,1000)
Button(master, text = "Print", command = print_point).grid(row = 3, columnspan = 2)
#Bind the Return key to the function, note that you need to use lambada here.
master.bind('<Return>',lambda event:print_point())
text_output = Text(master)
text_output.grid(row = 4,columnspan = 2)
text_output.config(width=30)
mainloop()